Does your phone go black, have an eternal loop or won’t turn on? Flashing it may help it react and function properly again. Falsifying a mobile phone consists of formatting its operating system to return it to its original characteristics and eliminate possible failures or corruption.
Although formatting a computer is usually a job for professionals in the area, many programs currently allow users to do it at home. Here, we explain more about it so that you know how to flash a cell phone easily.
What is flashing a cell phone and what is it for?

Flashing a cell phone is nothing more than formatting and reinstalling the operating system in a similar way to how it is done with computers. When reinstalling it, you can choose to restore the same version of the operating system, a higher or a lower one.
In the case of cell phones, the operating system is known as Firmware. The main difference between cell phone firmware and computer operating systems is that Firmware is unique. Each phone has its own, differentiated by brand, model and, sometimes, by country.
But what is the use of flashing a cell phone? It is used to restore the device to solve the problems that it presents. Some of them can be:
- It stays in the logo and does not start (eternal loop).
- It does not turn on.
- The screen goes black.
- Memory card not recognized.
- The device becomes very slow.
- The phone has a virus or malware failure.
- You need to update the Firmware or want to roll it back to a previous version.
However, even if a device has some of these drawbacks, before flashing it, you must also take other aspects into account. The main one is to make sure you know how to do the process, as it is delicate and, if it fails, it could cause permanent damage to the equipment. Also, by flashing it on your own, the equipment warranty is lost.
On the other hand, if the technology is very new or complex, it may require a more complicated process. In these cases, leave it in the hands of professionals, as they may use other more specialized ways of flashing a cell phone.
Before flashing a cell phone
If you have already decided to flash a cell phone, you should take into account certain basic aspects to have a good result and avoid the sudden death of the equipment. This is what you will need to consider before formatting a device :
- The USB data cable you use should preferably be the original one. Don’t use old, patched or faulty cables.
- You may need P2K drivers. They are used so that the device is recognized by the program (and by the computer), although some telephones do not need them.
- We advise you to make a backup of the mobile before flashing it. If you don’t, you could lose everything you save in internal memory.
- Each phone has a specific flashing program that depends on its technology. Many brands share the same technology. They also share the same flashing programs.
- You must make sure that the Firmware you install is the one that corresponds to your cell phone because if you use an inappropriate one, you could damage the equipment.
During formatting, the important thing is to consider the details. If any fail, it could cause a serious failure for your equipment. So take into account the following points while flashing a cell phone:
- Do not touch the cable or move it for any reason until the process is complete.
- Do not close the flashing program window during the process.
- Charge your cell phone 100% or at least 50%. It is more advisable to load it to the maximum because some processes take more time than others.
- If you’re using a laptop, charge it 100% or keep it connected during the process.
If, despite taking these precautions, the flashing program indicates a failure, the cell phone remains the same or no longer even turns on. It could be that something was not done correctly or that the computer’s hardware is damaged. If it was an error during the formatting, the device would need a “test point,” a process used to restore cell phones with failure due to bad flashing. In all the above cases, it is best to leave it in the hands of an expert.
How to flash a Samsung cell phone?

To flash a Samsung cell phone, be it new or old, you need an Odin (the official program that Samsung has for its devices). The process itself is not complicated, and it is summarized in these simple steps:
- Download, install and launch Odin.
- Download phone drivers (Samsung drivers). These are for Odin to recognize your device. The easiest way to install them is to download the official Samsung program called Kies (it is very easy to use).
- Download your phone’s operating system. You can download it from the SamMobile website. When choosing the Firmware, it must fully correspond to your mobile (including the country). To find the exact model of your device, check the back of it.
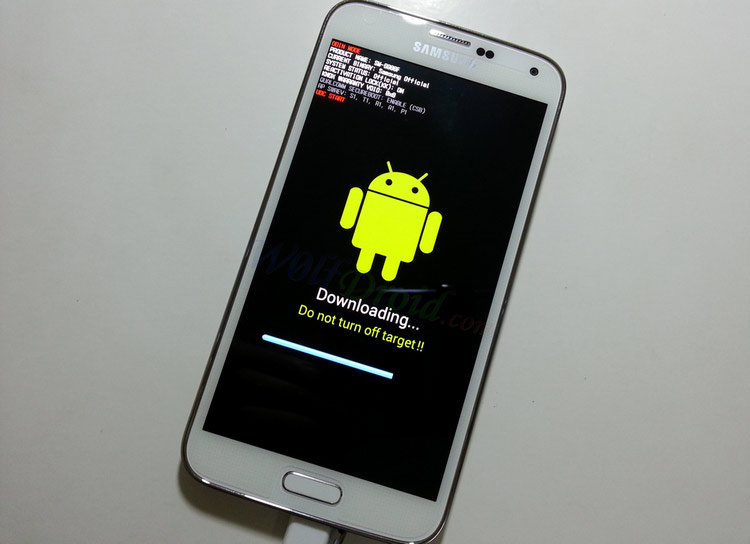
- Enter download mode on your phone. Press the volume down button, the home button and the power button at the same time. A message will appear on the screen (it will turn black if the phone is old and blue if the phone is new). When you see it, press the volume up button. Finally, “Downloading” should appear on the screen.
- In Odin, press the button “AP” or “PDA” (depends on version). Find the firmware folder. Once there, choose the file that says AP (it will have other words in the name, but this is the reference that interests us).
- At that moment, the files will begin to be copied to Odin. Wait until that operation is finished. You’ll know it’s over when a few letters appear in the box next to the “AP” button. Some phones only have this file, but others have more.
- Add other files if there are any. If you find in the same firmware folder other files (with the acronyms: LMS, BL, CP, and CSC), place them in the respective buttons. That is, press the corresponding buttons and open the files from them. If you see CSC Home and CSC, choose the latter.
- Select the “Auto Reboot” and “F. Reset Time.” This will depend on the version you have. If they appear, select them. If not, continue with the next step.
- Connect your device to your computer with the USB cable.
- Press the “Start” button to begin flashing. You will find it located right at the bottom of the Odin panel. Wait for the green bar located at the top of the panel to finish loading. You will also see that the white button called “SYSTEM” will turn green and say “PASS!”.
- Wait 10-20 minutes before the boot begins. Do not touch it until the process is complete.
- Disconnect the phone from your computer when finished. Do it when you see “Welcome!” Appear on the screen. Configure your mobile from the factory.
- If, when connecting a Samsung in Odin, a window appears that says “installing device”, let it finish since the program recognizes the drivers of the phone. In the end, you can click “Start” and flash the device.
How to flash a Huawei cell phone?

Some Huawei belongs to Mediatek or MTK technology. Therefore they are formatted with Flash Tool. Although there are many other programs, this tool is very effective.
For the other technologies that Huawei uses (HiSilicon, Qualcomm, and Spreadtrum), you must get a specific program in each case. If your device has an MTK processor, then you can easily flash a Huawei cell phone by following this step by step:
- Turn off the cell phone and remove the battery.
- Download, install and launch Flash Tool.
- Download your phone’s operating system. To do so, take into account the brand, model and country. Some of this data is on the back of the phone. To find and download the Firmware for any phone, you can visit the Firmware.Mobi page.
- Select in the Flash Tool menu the tab that says “Download”. A panel with several buttons will appear.
- Locate and select “Scatter Loading”. Once there, look for the “scatter” file (it will be a file that will also have other words) in the folder where you saved the operating system and double-click it. Once selected, the program files will be downloaded.
- Select “Download Only”. You will find this tab below the previous one, just to the far left.
- Go back to the menu and select “Format” another control panel will appear. There you must select the options: “Auto Format Flash” and “Whole Format flash except Bootloader”.
- Connect the cell phone to the computer with the USB cable.
- Press “Start”. You will see that a bar is formed, indicating that it has already recognized the program and started the formatting. Then, another green bar will appear and, when it has finished filling, a window will appear that says “Format OK” (with a green circular icon with a check), indicating that it is already formatted.
- Disconnect and reconnect the cell phone to the computer.
- Go back to the menu to the “Download” tab. Once there, press the “Download” button (it is the icon of the green date that appears first in this panel. You will see how a red bar is loaded first, followed by another purple bar and, finally, a yellow bar. 100% yellow bar, a window will appear saying “Format OK.” You just flashed the device!
- Remove the USB cable.
- Attach the battery to the cell phone.
- Switch it on. Please be patient while charging or uploading. The logo, presentation and settings will appear.
- Configure the mobile according to your preferences.
How to flash a Motorola cell phone?

Both Motorola and Lenovo phones share technology. Hence, they use the Lenovo Moto Smart Assistant or Rescue and Smart Assistant program. This program is very friendly. It practically does everything by itself; You just need to provide the appropriate information and have good Internet service (stable and fast), as it will install online. If you want to know how to flash a Motorola cell phone, follow these easy steps:
- Download, install and launch the Lenovo Moto Smart Assistant.
- Look in the menu for settings and change the language. Select the three-block stripes icon. When the options window appears, choose the language.
- Locate the “Snapshot” button on the menu. Once there, go to the bottom, where there are two buttons: “Go to update” and “Go to save.” One is to update the operating system and the other is to flash or format it.
- Press “Go to save”. New options will appear automatically. Take a look at the top 3 buttons for now.
- Press the “Moto Phone” button. The Motorola models that exist will be displayed in the boxes below.
- Choose your phone model.
- Read the instructions. Once you finish filling in both boxes, a window will appear instructing you to activate the “fast boot” mode.
- Connect the cell phone to the computer.
- Activate in “Fastboot Mode”. To do this, turn off the phone, press the volume down button and connect the USB cable.
- The device will boot into “Fastboot Mode”. You will know that it has started because only letters will appear. You will need to press the volume down button on some Motorola models until the “Start” option appears.
- Wait for the software to download. You can check how the download is going in the program settings. To do this, click on the icon with the three horizontal lines located in the upper right corner, and choose “Download Center”.
- Once the Firmware is downloaded, choose “Save” or “Rescue now.”
- Press continue on all the warnings that appear and it will start flashing.
- Once finished, it will say “Completed”, and your mobile device will restart and the logo will appear.
- Remove the cable and wait until the device asks you to configure it.
Programs to flash cell phones
One of the essential points to flash a cell phone correctly is to have the phone’s right program. However, not all cell phones work with the same software since it must be chosen based on cell phone technology.
In this sense, to learn how to flash a cell phone without any inconvenience, you must locate the most convenient for your device among the following programs to flash cell phones:
- Odin: it is the official Samsung software to install ROMs or firmware on your computers. It works for all Samsung devices.
- Download 300k tool mode: Another good app that works for Samsung phones, but it’s not official.
- SP Flash Tool: works for all computers with Mediatek processors (for example, Vodafone, BQ Aquarius A.5, HTC One M9 +, Energy Sistem Pho, Sony Xperia C4, Meizu Metal, Woxter Zielo Q27, Xiaomi Redmi Note 3, ZTE Blade V6, Alcatel One Touch POP Star, some Huawei, etc.). It is known as one of the best on the market.
- Windrroid: It works for devices with HTC technology.
- Lenovo Moto Smart Assistant: is an application for Windows and Linux that is used to flash Motorolas and Lenovos.
- RSD Lite: This tool serves to flash stock firmware on older Motorola devices. This application can flash images with the following extensions:
- Fastboot files (xml)
- Super file (shx, SBF)
- Flex file (hs, HSX)
- Zip file (zip, bzip, gz, tgz, bz2, tbz2)
- LG Flash Tool – This is LG’s official program for its technical services.
- KDZ Firmware Updater (LG): This unofficial program also allows you to update or flash operating systems (firmwares) on LG phones. To install it, you must have administrator rights. It is used for files with KDZ, FW and UPD extensions.
- LGMobile SupporTool: this tool is used for emergency firmware recovery on LG devices. It works only on devices manufactured after 2015. Not compatible with pre-2015 models.
Samsung files are extension md5. It is not the same to flash a phone as to unlock it. If you don’t know what type of technology your cell phone is, look for its processor in the model’s specifications (on the internet).